We’re pretty excited about our new SheetCutter Pro and TemplateDesigner Pro applications that are coming out later this year, so we thought we’d highlight some of their cool new functionality and the functionality in ArcGIS Pro that we really like. Keep reading our blogs to find out more!
Manual Start and Stop Edit Sessions Have Been Replaced
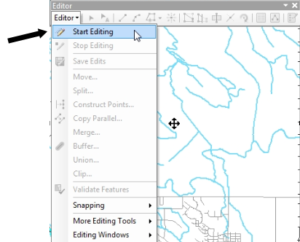
In ArcMap, starting and stopping an edit session was done manually, from the ArcMap Editor toolbar by completing the following steps:
- Display the Editor toolbar by right-clicking anywhere along the top where the toolbars are and selecting Editor from the drop-down list to add it.
- From that Editor toolbar, click the Editor drop-down button and select Start Editing.
- Most likely, a pop-up dialog opens showing the layers you have in your map, then click Continue.
- You are now considered to be “in an edit session” and you can create, delete, and manipulate features in the map.
- At the end of your session, return to the Editor drop-down button, click it and select Stop Editing.
- If you end your edit session without saving your edits, your changes are reverted to before the edit session started and you have to re-perform all of those edits. It’s an easy way to lose your work.
In ArcPro, you don’t have to do any of these steps. You are always in an edit session and you can start editing features at any time.
ArcPro does require you to save your edits to commit them to the geodatabase (like ArcMap), even though you don’t need to manually stop your edit session. If you make edits and try to close your project in ArcGIS Pro, it will prompt you twice, once to save your edits, and a second time to save your project, so you’ll never lose your edits.
There is also a dedicated Save Edits icon that you should add to your Quick Access bar so you can easily save edits as you go. To add that icon, complete the following steps:
- In ArcGIS Pro, make sure you have a Map tab open.
- Click the Edit
- In the Manage Edits section, find the Save
- Right-click on it and select Add to Quick Access Toolbar.
In ArcGIS Pro, you can also undo individual edits immediately. No more turning your editor on and off. Instead, you can now undo individual edits directly from the ArcGIS Pro ribbon. If you use Word, then you know how this functionality already works.
- Find the Undo and Redo icons, they are most likely in the top left-corner of the interface.

- Undo lets you reverse the most recent action.
- Redo lets you repeat the most recent action that you reversed.
Be sure to visit our website to read more about what’s new in SheetCutter Pro and TemplateDesigner Pro.